Django-Dynamic HTML page creation with image(user profile page )
In this blog,we are going to create a log-in page for our page and we will create a dynamic html page for displaying user’s profile and personal details whoever logs in.Displaying user uploaded images inside an app along with user details is explained in this blog.Here,we are going to create a model(table) which holds all the user details like profile pic,email,education and create a dynamic html page to show the user details and the content for the page changes,whenver a different user logs in.To create a sign-in page -https://medium.com/aws-tip/django-sign-in-page-with-otp-verification-via-email-59ba45bc4871

HOME PAGE
Now, first of all, we should create a home page that has four buttons,sign-in ,log-in, create profile and show profile.Here, we can use sign-in page to create a profile for a user but by using a model in this simple use case will be help you to understand the models architecture of Django.Ok,now,we create a home page for the buttons
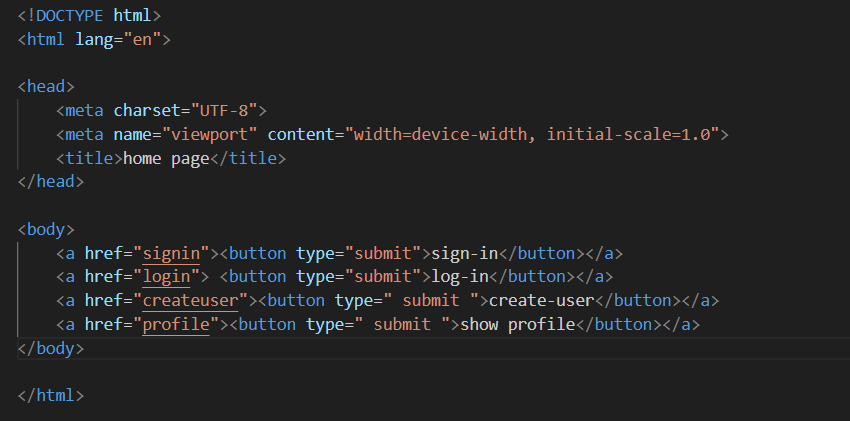
Here,we have created four buttons and each button is inside an <a> tag which means,whenever the button is submitted,it will direct the user to the respective views.In href,we give function based view’s name,indicating that the submit action should direct to the particular view.
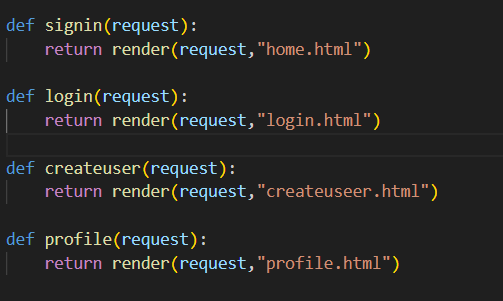
Each view in the above picture simply render a html where user can either enter the details or view the details

Each view is routed in urls.py file.If the view is not routed then the app will not find the view and throws error.Four html pages have to be created inside the templates folder(sigin,login,createuser,profile)
LOGIN PAGE CREATION:
Ok,now we are going to work on login html page to get username and password.
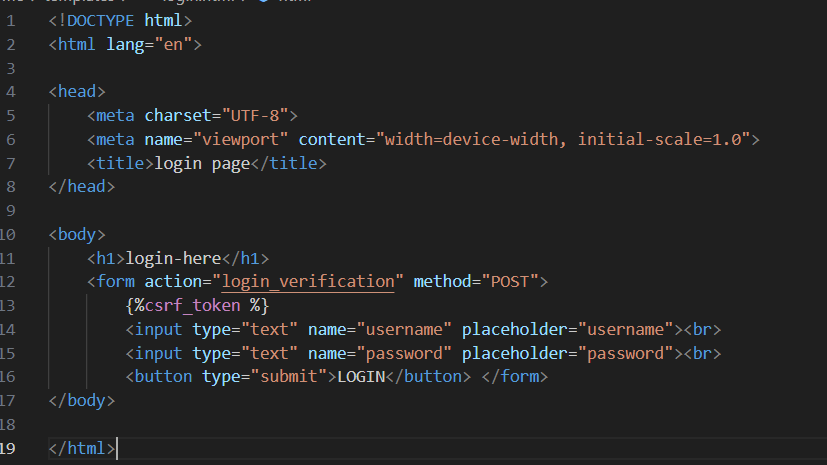
We create a form and get two inputs from the user,username and password.The method will be post as the password is sensitive.The action will be login_verification where we check for the username in the database and the password and anthenticate the user.
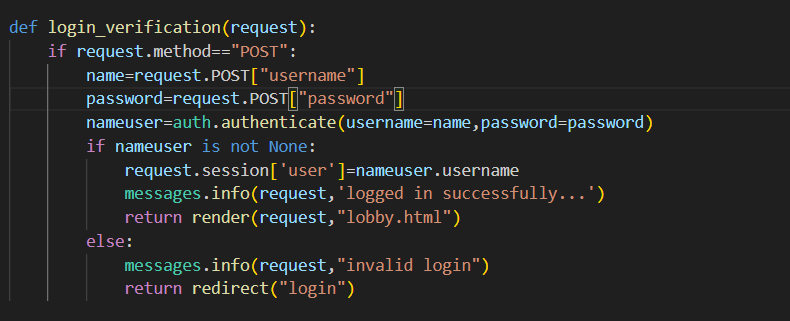
Here,in login-verification view,we get the username and password and we check for the authentication.In django,there is a build in method called authenticate() which will surf through the DB and if the username and password exists,it will return the username or else it will return None.We use a if statement for further process(rendering html pages).If the authentication is success,user will be logged in or else alert message will be popped up denoting invalid login.Here,a session variable is created named user.This is created to denote that the user is logged in.The create user button will not work until the session variable user is created.This ensures that only the logged in user can create a profile.
CREATING A MODEL:
Now,let us create a model which will have the fields to be displayed in user profile section.To create a model, go to models.py file and create a model class.Each user defined model should inherit the models.Model class.Here,why should we inherit models?This is an exciting feature in Django that enables developer to inherit the existing fields into their own model class.For example,,we use models to inherit datafields,which denotes the datatype of the field.
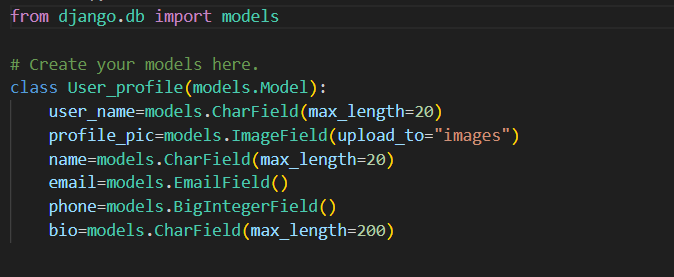
Our model consists of a profile_pic field which holds the image of the user.Imagefield() denotes that the field accepts images.upload_to denotes the location where the image must be stored.Likewise,there are textfield,emailfield and BigIntegerfield.
Now,we have to migrate the changes to the database
\>\>python manage.py makemigrations
Now,we have to get the details from the user for creating the user.We move to createuser html file and create a form which will get the our model’s fields as input and we create a view called save to update the details to the database.We can also create a user using admin panel(Admin panel will be discussed in a separate blog).
Now,as we are getting an image as a input,where will be store the image.Here,the images will be stored in media files.In django,we need not create a media folder as it will be created automatically whenever a media is unrouted.Thus,we just need to create root for the media.
MEDIA FILE:
In settings.py,we add the following lines to create a base url for media files and a path to store it,
\>>main project>>settings.py

In urls.py file of the main project,we should add this media_root path,
\>>main project>> urls.py

import the following ,
\>>from django.conf import settings
\>>from django.conf.urls.static import static
UPLOADING USERIMAGE BY USER WITH USER DETAILS:

This will be our form.Here,the input type of the image file will be specified as “file”.In django,all the image and other static files fall under file type.Thus file input file is used to get the image as an input from the user.The accept parameter indicates that this field will accept only the specified type as the input.In our case,it is image.The other input types used here are tel(to get phone number),email(to get email ) and text.
Now,lets work on views to save the details to the database.So,let us create a view and name it as save
STORING INTO DATABSE:

Here,we use request.file to post the image file and for all the other fields,we use request.post.To insert a row,we use ORM.Here,we wanna import the model into views.py.Now,use the model name and enter the data,In our case,User_profile(field1=value1,field2=value2).This is similar to the sql query — INSERT INTO table_name (column1, column2, column3, …)
VALUES (value1, value2, value3, …); and to save the changes,we use .save() method.
Now,to display the user_profile,lets work on profile view

In this view,we will select a row from the table which matches username who is logged in.get() method will return a dictionary with fields as its key and user details as its value.
output of get() function
The user must be logged in to get the user details.Here we make a few changes to do that.

while logging in,we created a session variable named user.This variable will be created only after the successfully log-in.Here,in our profile view,we uses that session user to fetch the data from the database.Thus,if the user is not logged in ,the session variable wil not be created and using it will through an exception.So we use try-except.We try to get data and if the user is not logged in,except block will be executed and a pop up will notify the user to log in.
The user details are quered and stored in a variable.This variable will be passed to the html to display the details.All the vatriables in the views is passed to the html page in dictionary form.We can access the view variable with the help of the dictionary’s key.In our case,user is the key and queryset will be the value
DYNAMIC HTML PAGE:
In profile.html ,we display the user details.This page is dynamic and the content of this page changes whenever different user logs in.
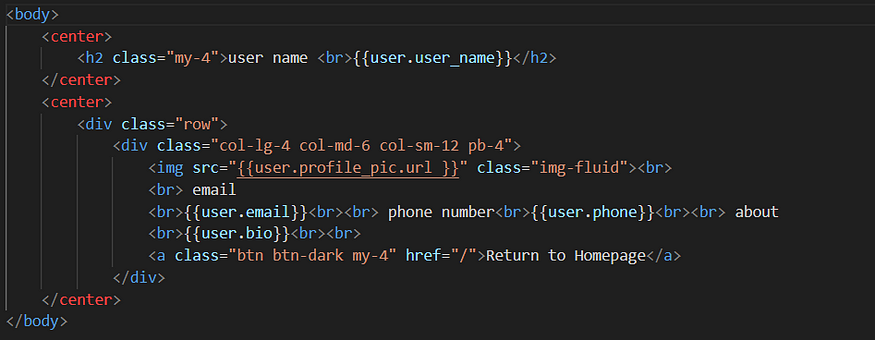
In profile view,we passed a dictionary with the user details.Those details will be rendered into the html file using jinja code.The data is passed in dictionary form thus we can use keys to access the user details(“.” is used to access the keys of the dictionary).For example,to access the email,we use user.email(here,user is the dictionary name and email is the key which holds user’s email as its value).Likewise we can access all the fields with dictionary passed.Here,the point to note here is while accessing the image file,we have to use .url in the end.
Summary:
created a log in page.
created a model to store the user details.
created a form to get user details.
created a dynamic html page to show the user details.