Django-Calculator app(Beginner’s friendly)
Django is a powerful web framework which is used to create amazing websites.While learning a framework,we must do several mini projects in order to get familar with the framework.Now,in this blog,we are going to create a simple calculator app.Let’s jump into the project.

Note:It’s a pure django project so we aren’t gonna use js here.(It’s a beginner’s friendly tutorial,all the coding are made simple.)
To create a Django-project :
\>>django-admin startproject calculator

navigate into the project using your fav editor.Here,we are going to use VS code.
create an app inside our Django project

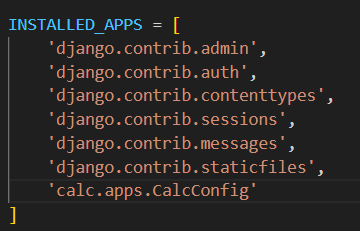
Register the app inside the installed app section in settings.py
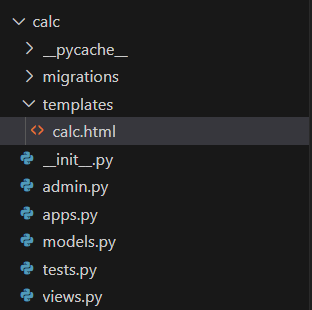
For user interface,we have to create HTML file through which the user enters the input and the output will be displayed.
Create a folder and create a html file inside the folder.Then, merge the templates folder to the base directory so that the framework can locate the HTML file.
Now,Go to settings.py file and find templates section.There,join the created folder with the base directory.

Now,we are going to code our logic inside the views.py.But,how are we going to route the created app to the main project.To do so,create a urls.py inside the created app and there,we have to route the views created by us.This urls.py should be included to the main project’s urls.py.

The app has been added to the main project.Now,we have to map the view to its url pattern.To do so,create urls.py file inside the app
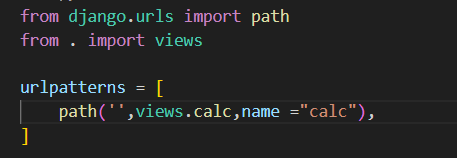
here,we have import the views from views.py and map it to the urls.Here,the calc view is mapped to home page as the empty string denotes home page
In views.py:

This view will render the html which will be our calc reception.Now,we are going to work on html page to get the inputs from the users.
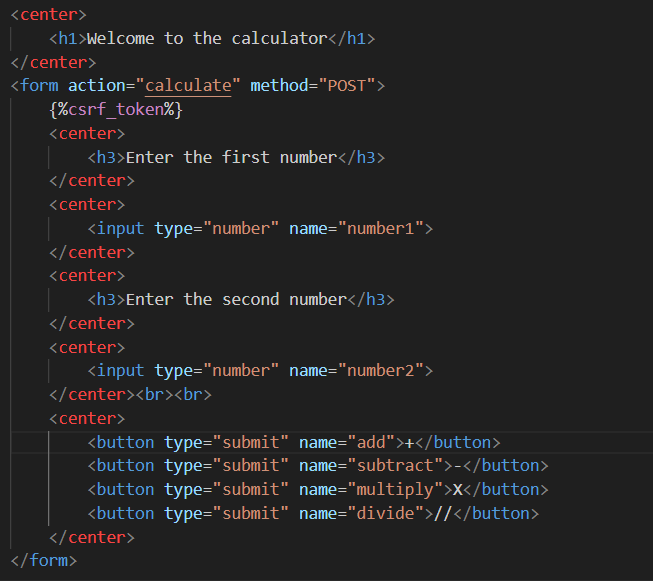
Here,we use form to get two inputs from the submit.Here,we have used 4 submits from four different operations.The method parameter in the form is used to handle the form inputs and when the submit button of the form is clicked,there will be a connection established between the form and the view.The inputs will be processed the view denoted.The submit buttons are named by the operations and the names of the each button will be passed to the views via POST request.Here,csrf token has be added to the form for security reasons.
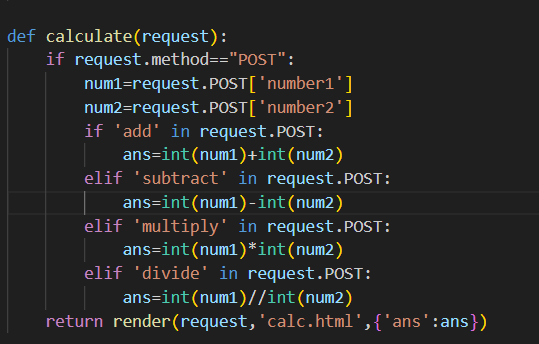
In theview,the input from the from is get through the request.POST() method.Here,each button represents each operator and the operation type is passed from the button via post method.This is handled by if statements.If the value passed by the button is add,then the if with add will be executed.
This ans can be displayed in the html page through jinja code.Use {{}} and pass the key value inside the jinja tag to see the output.The routing should be done for the view that are created.

The output will be
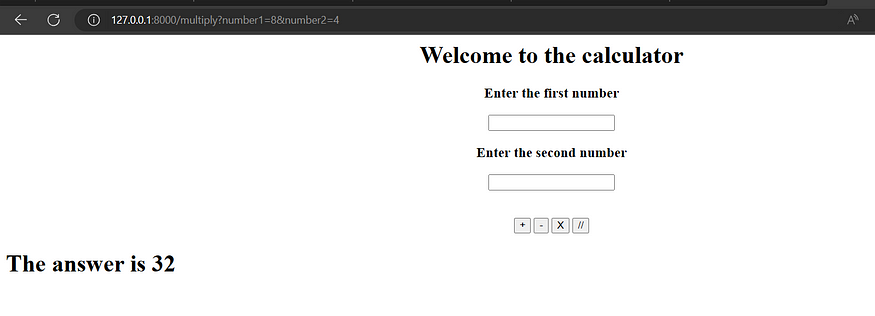
Here,the input is disappeared as we rerender the page.We will learn to dispaly the answer without rendering the html to keep the input visible in the upcoming blog.
This is the simple calculator app.We are going to build a complex calculator app in the upcoming blogs.Stay tuned!!